With supply chain shortages and part delays becoming the new normal, assessing component availability and lifecycle status during the schematic design to ensure the parts chosen will be available when the design is ready to produce is critical. LiveBOM, included in OrCAD X, is a new tool that takes these worries away by tracking the status of each component and providing real-time supply chain data in your design.
This quick how-to will provide step-by-step instructions on how to use LiveBOM in OrCAD X Professional.
To follow along, download the provided materials above the table of contents.
How-To Video
 Open in New Window
Activating LiveBOM
Step 1: Open the provided design in OrCAD X Capture CIS.
Note: Make sure to open OrCAD X Capture CIS with a license of OrCAD X Professional. Log in with your Cadence username and password if prompted.
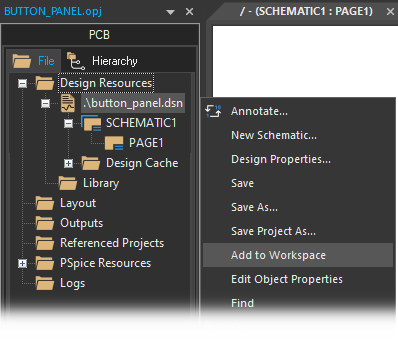
Step 2: Right-click the DSN file in the Project Manager and select Add to Workspace. This will add your design to your workspace to access LiveBOM.
Step 3: Select Tools > Live BOM from the menu.
Note: If you receive a prompt that the LiveBOM data must be regenerated, click OK, save the design file, then select Tools > Live BOM from the menu again.
Navigating the LiveBOM Interface
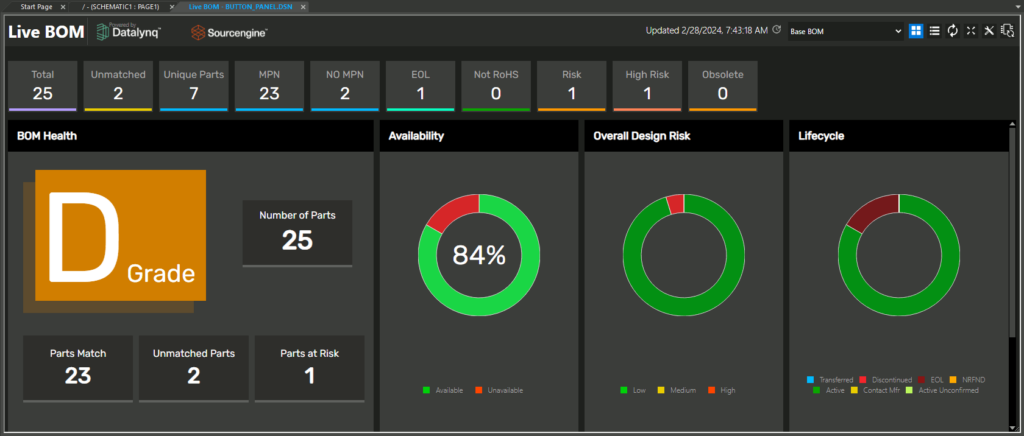
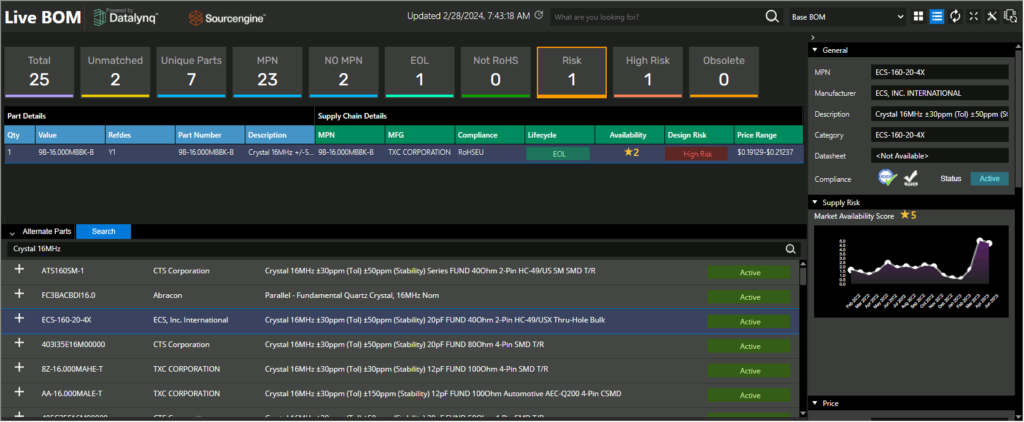
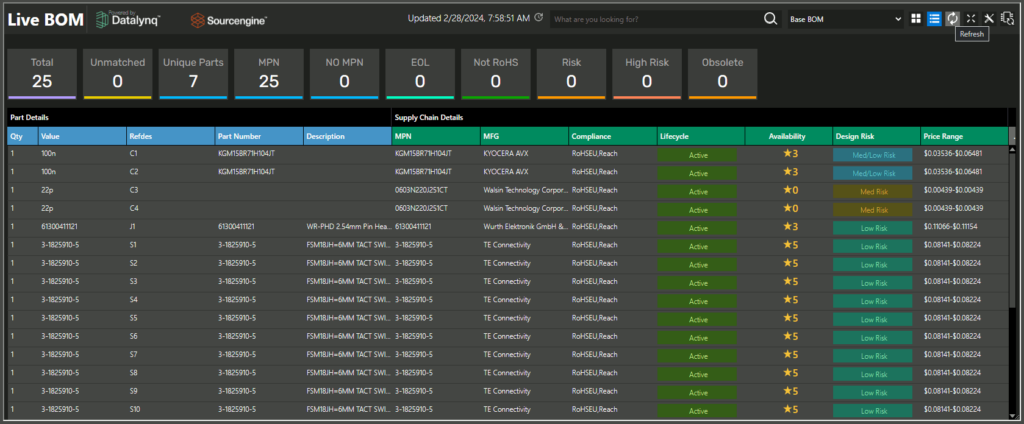
Step 4: View the LiveBOM interface. At the top of the window, there are several categories for parts including:
- Total: The complete list of parts.
- Unmatched: Lists all parts with no matching manufacturer part number (MPN).
- Unique Parts: Lists all unique part numbers used in the design.
- MPN: Lists all parts with a manufacturer part number.
- No MPN: Lists parts with no matching MPN.
- EOL: Lists parts at the end of their active life.
- Not RoHS: Lists parts that are not RoHS-compliant.
- Risk: Lists parts that are considered at risk.
- High Risk: Lists parts that are considered at high risk.
- Obsolete: Lists parts marked as obsolete.
Selecting a category will turn its filter on or off.
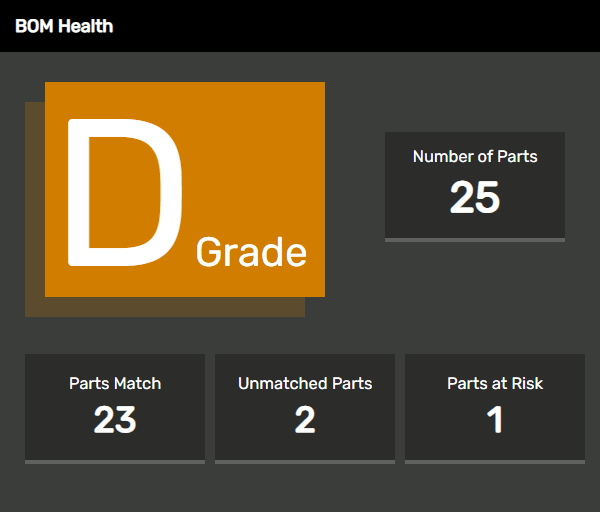
Step 5: View the BOM Health panel. This panel shows a letter grade for the design based on the number of parts matched, their availability and their risk. The numbers of matched, unmatched, and at-risk parts are also shown. Currently, the design has a grade of D, as two parts are unmatched and one is at risk.

Step 6: View the pie charts on the right side of the window for Availability, Overall Design Risk, and Lifecycle. The charts are mostly green, indicating low risk.

Step 7: Scroll down to view the tables for High-Risk Parts, End of Life Parts, and Inventory Risk parts. The part with manufacturer part number 9B-16.000MBBK-B is listed as a high-risk part and end-of-life part, as it is considered obsolete.
Use LiveBOM to Replace High-Risk Parts
Note: All at-risk parts can be viewed in the Risk Category.
Step 8: Select Risk from the top to view the list of at-risk parts.
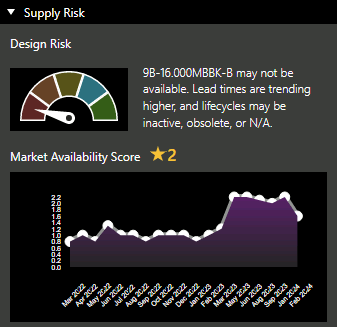
Step 9: Select the row for Y1. Under Supply Risk in the Properties panel, the part is listed as “may not be available.”
Note: For selected components, LiveBOM also shows:
- General part information including manufacturer, manufacturer part number, a description, and the category. If available, a link to the datasheet is provided.
- REACH/RoHS Compliance
- Status
- A plot of the market availability score over time
- A minimum and maximum price for over a set time period
- Number of vendors with inventory
- A plot of the vendors with inventory over time
- Component-specific properties
Step 10: No alternate parts are listed. Select Search to search for an alternate part.
Step 11: Enter Crystal 16MHz into the search field and press Enter.
Step 12: Select an available crystal from the listed parts that is reported as low risk. The properties panel shows a higher availability score and more distributors carrying the part.
Step 13: Select the plus sign for Replace MPN to replace the part number. The MPN columns are populated with the part information.
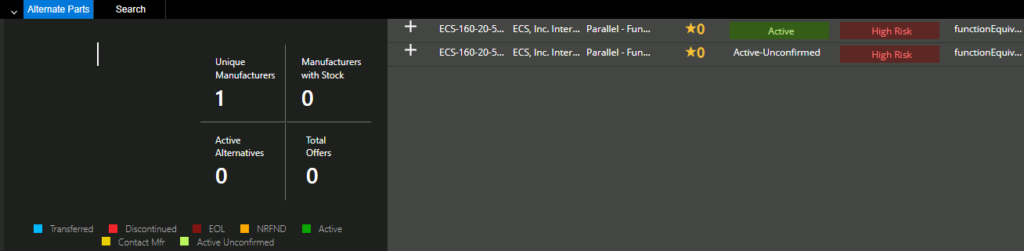
Step 14: View the now-populated alternate parts list and the associated risk.
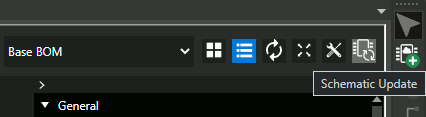
Step 15: Select Schematic Update at the top of LiveBOM. This will change the part number in the schematic.
Note: The part value and footprint will need to be updated manually to reflect the part changes.
Correcting Unmatched Parts in LiveBOM
Step 16: Two capacitors in this design do not have manufacturer part numbers and therefore cannot be analyzed by LiveBOM. Select the No MPN button from the top.

Step 17: View the list of components. All columns from MPN onward are listed as “Unmatched.”
Step 18: Select C3 (22pF capacitor).
Step 19: Enter 22pF into the Search field and press Enter.

Step 20: Select the first listing of a 22pF capacitor with footprint 0603. Select the plus sign for Replace MPN to replace the part number. The MPN columns are populated with the part information.
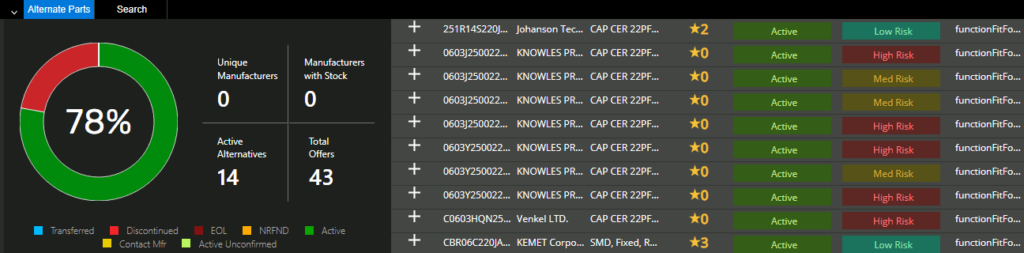
Alternate parts are now listed. If any manufacturers list the part as discontinued or EOL (end of life), different colors are shown in the pie chart.
Step 21: Select Schematic Update at the top of LiveBOM.
Correcting Unmatched Parts in the Schematic
Note: Part numbers can also be modified within the schematic and synchronized with LiveBOM.
Step 22: Select the tab for the schematic.
Step 23: In the project hierarchy, right-click on the .dsn and select Edit Object Properties.
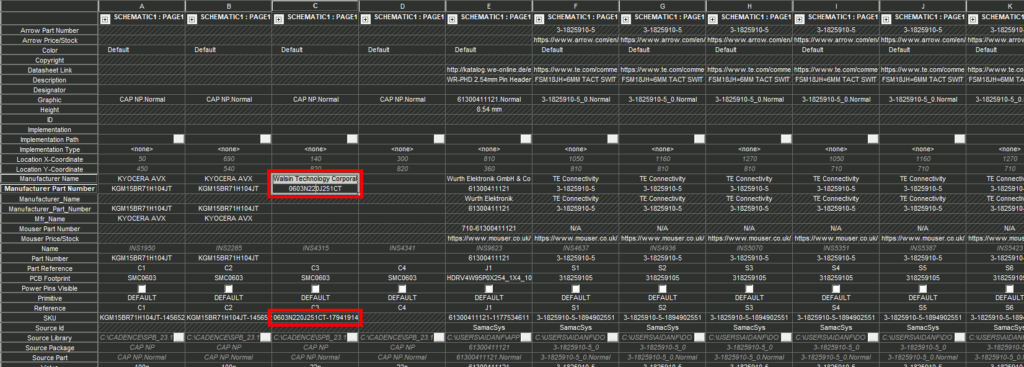
Step 24: Locate C3. The Manufacturer, Manufacturer Part Number, and SKU fields have been updated to reflect the part change. Hold Shift and select the cells for Manufacturer Name and Manufacturer Part Number for C3.

Step 25: Click and drag to extend the manufacturer name and part number into the columns for C4.
Note: This can also be achieved by using CTRL+C and CTRL+V to copy and paste the information within the Properties window.
Step 26: Select the cell for SKU for C3. Click and drag to extend the SKU into the column for C4.
Step 27: Click Apply and close the Property Editor tab.
Step 28: With the design file selected in the Project Manager, select File > Save from the menu.
Step 29: In the LiveBOM tab, select Total to return to the full component list.
Step 30: Select Refresh to refresh the BOM. C3 and C4 are now listed with their part numbers.
Note: Repeat this process as needed with other unmatched components.
Wrap Up & Next Steps
Use LiveBOM in OrCAD X to quickly analyze supply chain risk, find suitable alternate parts, and guarantee purchasable components for your PCB designs. Test out this feature and more with a free trial of OrCAD. Want to learn more about OrCAD X? Get access to free how-tos, courses, and walk-throughs at EMA Academy.

