Audio circuity has become quite ubiquitous in modern technology. The field of A/V engineering has expanded beyond the traditional home and car stereo systems to compact stereo units, phones, Smart speakers, and even PCs. It is easy enough to simulate audio circuitry with a simple sine or square wave source, however, this rarely paints a qualitative picture of how the circuit will perform in the real world. New in PSpice 23.1 is the ability to use a .Wav file in PSpice to increase accuracy in your circuit analysis with import and export capabilities.
This quick how-to will provide step-by-step instructions on how to use a .WAV file in PSpice Designer.
To follow along, download the provided files above the table of contents.
How-To Video
 Open in New Window
Place the WAV Source
Step 1: Open the provided design in PSpice Designer.
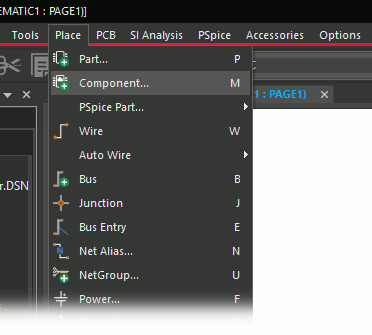
Step 2: Select Place > Component from the menu. The Component Explorer tab opens.
Step 3: In the Categories list, expand PSpice > Source > Independent Sources and select Voltage Source.
Step 4: Select WAVESRC. Right-click and select Place.
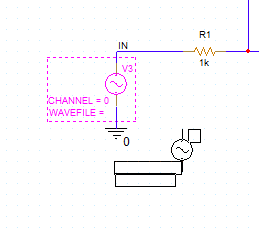
Step 5: Click to place the WAV source on the input net. Right-click and select End Mode.
Load the WAV File
Step 6: Before the WAV source will generate any useful data, a WAV file must be loaded. Double-click the WAVEFILE field to define the file.
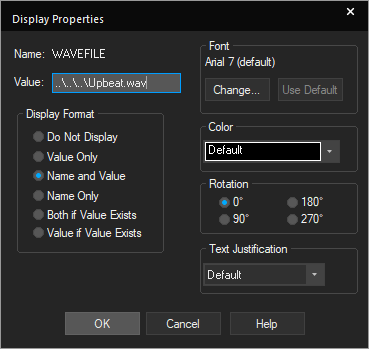
Step 7: Enter ..\..\..\Upbeat.wav into the Value field and click OK to link to the provided file.
Note: ..\ will tell the program to look for the file one folder up. For this example, the WAV file is located in the PSpice simulation folder three levels up. The exact file path to the .wav file can also be entered into this field.
Create the Simulation
Step 8: Select PSpice > New Simulation Profile from the menu.
Step 9: Name the simulation profile Amp_Trans and click Create.
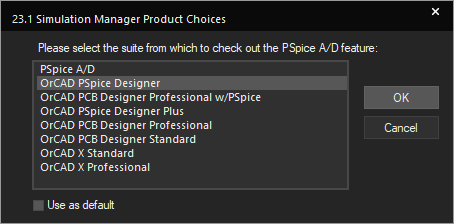
Note: If the Simulation Manager Product Choices window opens, select the appropriate license and click OK.
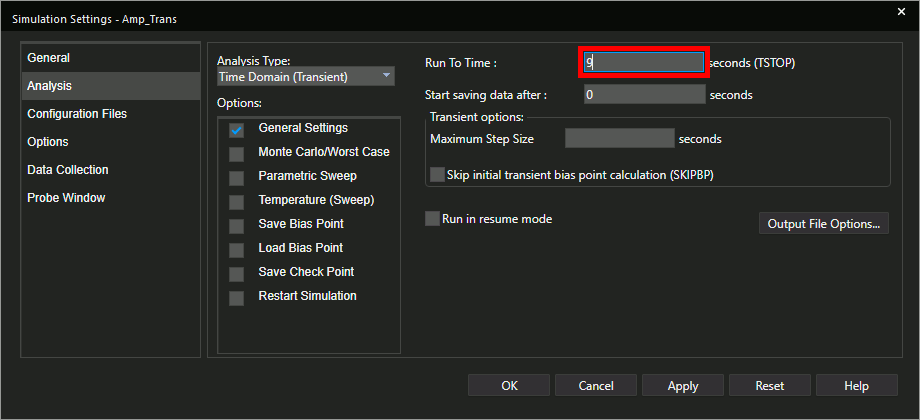
Step 10: Set the Run To Time to 9 for a runtime of 9 seconds.
Note: The provided WAV file is 9 seconds long. In your own designs, adjust this value to be the length of the WAV file you are using. Longer files will use more memory.
Step 11: Click OK to save the settings and close the window.
Step 12: Select the Voltage/Level Marker button from the toolbar.
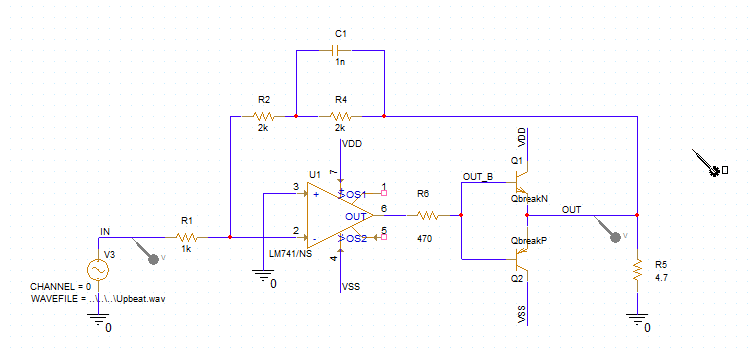
Step 13: Click to place probes at the IN and OUT nets. Right-click and select End Mode.
Use a .WAV File in PSpice for Simulation
Step 14: Select PSpice > Run from the menu to start the simulation.
Note: The simulation will take some time to run due to the relatively large file.
Step 15: A Large Data File warning appears. Select Ignore this Warning and click OK to ignore the warning and show the results.
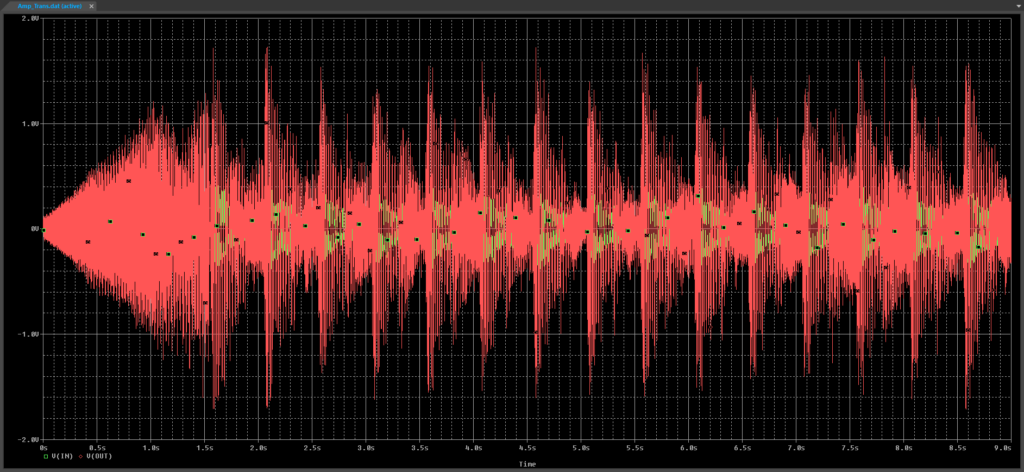
Step 16: View the simulation results. V(IN) shows an audio signal and V(OUT) shows an amplified version of the signal.
Generating a .WAV File
Note: In addition to importing an external audio file, PSpice can save a processed audio file, for example, to simulate an audio processing circuit.
Step 17: Close the PSpice A/D window.
Step 18: Back in the schematic canvas, select Place > Text from the menu.
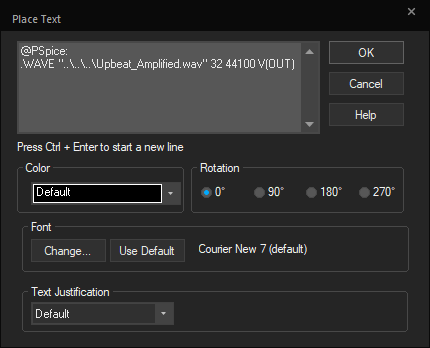
Step 19: Enter the following text into the Place Text window.
@PSpice:

.WAVE "..\..\..\Upbeat_Amplified.wav" 32 44100 V(OUT)
Note: Use CTRL-Enter on the keyboard to start a new line. The following syntax should be used to define the .wave file exported:
.WAVE <filepath> bit-depth sample-rate <list of nodes>
Where:
bit-depthis the resolution of sound.sample rateis the sample per second.list of nodesdefines the number of channels in the output.
The expression in this example will generate a WAV file sampled at 44.1kHz (CD quality) with 32 bits per channel.
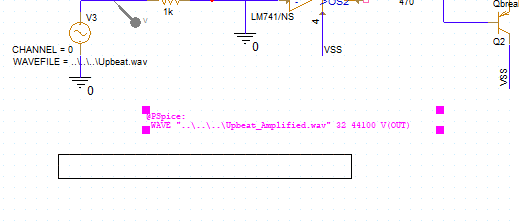
Step 20: Click OK and click to place the text in the schematic canvas. Right-click and select End Mode.
Step 21: Select PSpice > Run from the menu to start the simulation.
Step 22: In the Large Data File window, select Ignore this Warning and click OK. The audio waveforms appear as before.
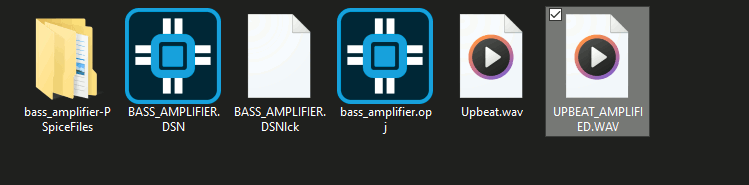
Step 23: Browse to the working directory. “UPBEAT_AMPLIFIED.WAV” is shown in File Explorer.
Step 24: Open the audio file in your preferred media player. Some bass boost has been added to the audio.
Wrap Up & Next Steps
Efficiently use .WAV files in PSpice to increase the accuracy of your audio circuitry simulations. Upgrade to the latest 23.1 release or test out this feature and more with a free trial of OrCAD.
