Cloud workspaces can be very beneficial to teams which require flexibility in accessing parts and designs by providing:
- Access to data anywhere in the world
- Access for internal and external stakeholders
- Easy management of data
To effectively utilize cloud workspaces, minimal configuration is required to ensure proper access, user roles, and a consistent database. Quickly configure a cloud workspace in OrCAD X Capture to enable efficient team collaboration for your PCB designs with settings for:
- Data residency to configure the location of your cloud data
- Default user roles to minimize errors
- Automatic database configuration
This quick how-to will provide step-by-step instructions on how to configure a cloud workspace in OrCAD X Capture to enable team collaboration for libraries and designs.
How-To Video
 Open in New Window
Configure a Cloud Workspace in OrCAD X Capture
Step 1: Open an existing design or create a blank project in OrCAD X Capture 24.1.
Step 2: Select View > Workspace > Configuration from the menu.
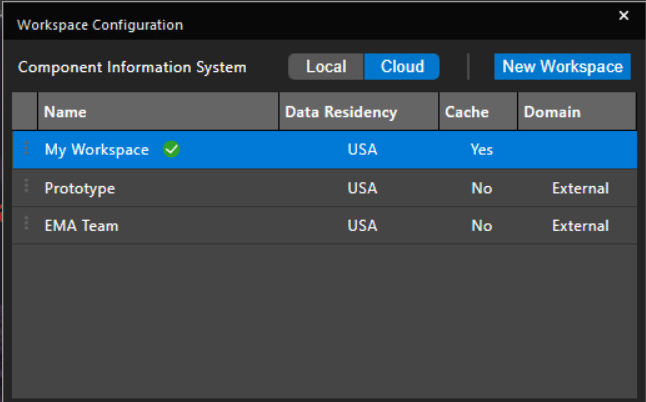
Step 3: Under Component Information System, select Cloud. This will ensure the Part Manager is checking the cloud database for changes to parts instead of the local CIS database.
Step 4: Select New Workspace.
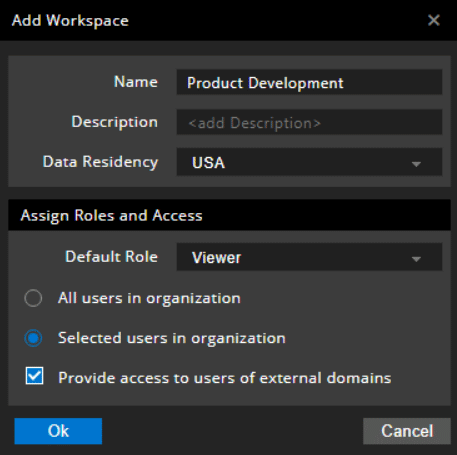
Step 5: Name the Workspace Product Development and add a description if desired.
Step 6: Select USA for the Data Residency. This will configure your data to reside in the USA. Other options include Japan, Asia, and Europe.
Step 7: Set the Default User Role to Viewer. This will ensure that users added to the workspace will only be able to view libraries and designs.
Note: You can configure the roles for individual users once they are added to the workspace. Other roles include:
- Administrator: Ability to lock and unlock all objects, create and delete shared workspaces, add and remove members to workspaces, and assign roles and privileges.
- Librarian: Lock and unlock library objects including symbol files, footprints, components, 3D step models, and PSpice models.
- Designer: Lock and unlock design items including schematic designs, board files, and analysis files.
- Designer, Librarian
- Viewer: Read only access to all objects.
Step 8: For user access, choose Selected users in organization. This will allow you to define which users in the organization have access to the cloud workspace.
Step 9: Check Provide access to users of external domains. This will allow you to collaborate with users outside of your organization like Contract Manufacturers and OEMs.
Step 10: Click OK.
Add Users to Cloud Workspaces in OrCAD X Capture
Step 11: The Product Development Workspace has been added to the list of available workspaces. Right click the workspace and select Set as Default. This will make the cloud workspace your default workspace.
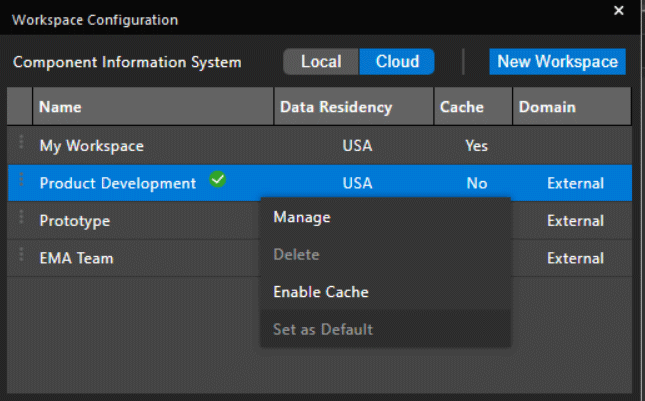
Step 12: Click to select the workspace.
Step 13: In the Shared with section, enter the email of a team member or stakeholder and click Enter. This should be their Cadence account email.
Note: Users will need to be assigned a cloud workspace from the Entitlement Management System (EMS).
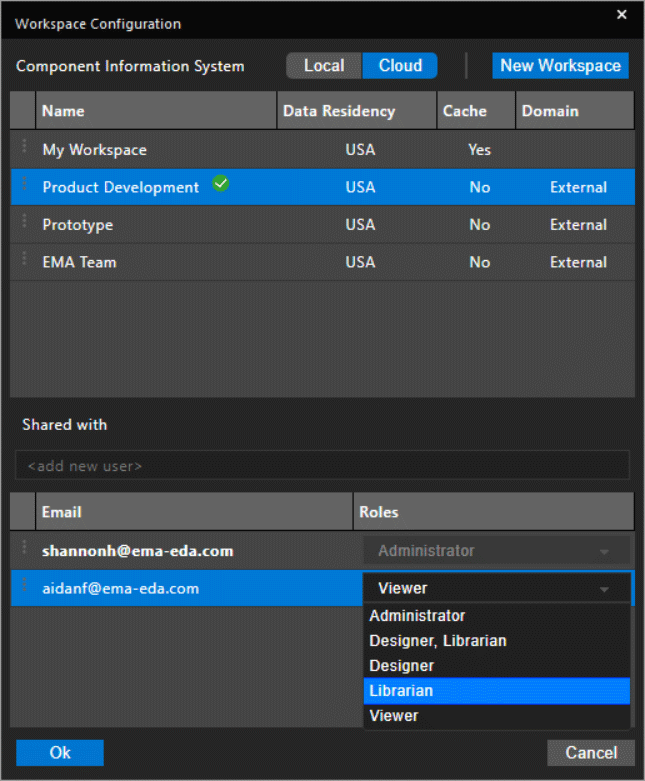
Step 14: Select the role dropdown for the newly added user and select Librarian. This will give the user the permissions to view, modify, and add data to your libraries and workspaces.
Step 15: Select OK.
Configure a Cloud Workspace in OrCAD X Capture: Database Configuration
Step 16: Select Place > Component from the menu.
Step 17: The Product Development workspace is now visible in the Categories and highlighted in green to show the default workspace configuration.
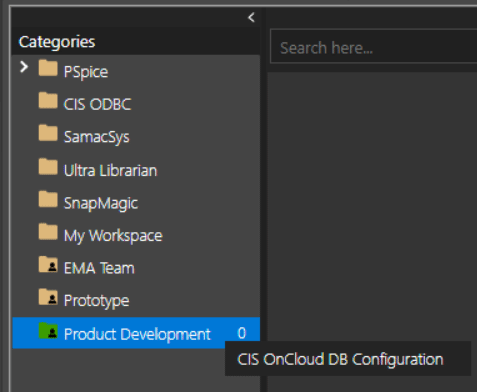
Step 18: Right-click the Product Development workspace and select CIS OnCloud DB Configuration.
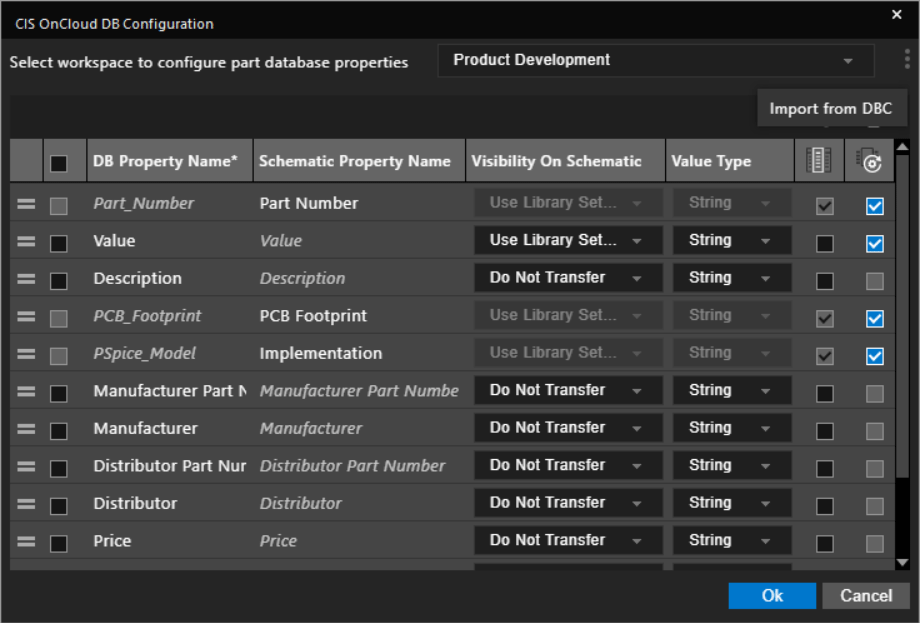
Step 19: Here you can configure your database schema for your component database. Click the three dots at the top of the window and select Import DBC.
Step 20: A database configuration with common properties is automatically populated detailing the following information:
- DB Property Name: Property name in the database
- Schematic Property Name: Property name in the schematic
- Visibility on Schematic: Use the drop-down menu to configure the desired visibility of the property on the schematic
- Value Type: Use the drop-down menu to configure the value type, either numeric or string
- Show in Place Component: Select to show the property
- Update Part Property: Select to update the part property
Note: Additional database fields can be manually added with the + sign in the database configuration window.
Step 21: Click OK. Parts can now be published to the shared workspace for all team members to access. Database properties defined in the configuration will be present when creating and adding parts. Click here for step-by-step instructions on creating and publishing parts.

Step 22: Select the File Manager icon on the toolbar.
Step 23: The workspace is visible and can be used to share designs and files with team members. Get step-by-step instructions for sharing designs and libraries here.
Wrap Up & Next Steps
Easily configure a cloud workspace in OrCAD X Capture and enable collaboration for your entire team. Test out this feature and more with a free trial of OrCAD X. Want to learn more about OrCAD X? Get access to free how-tos, courses, and walk-throughs at EMA Academy.